How to conenct LED Strip lights – this guide walks you through all of the relevant information, techniques, and notes worth mentioning. It also highlights the usual blunders that many people make.
The LED strip installation guide covers everything from basic knowledge on connecting LED strip lights, the things that you would need in the process, and as well as step-by-step instructions. So, let’s look at how to connect LED strip lights with a few easy tips and methods.
Table of Contents
How to Connect LED Strip Lights in 60 Seconds without Soldering
Strip lights are cuttable and linkable, and they come with 3M double-sided back adhesive, making them simple to install be it indoors or outdoors. White LED strip lights are ideal for ambient lighting, accent lighting, and task lighting in both commercial and residential spaces. RGB and dream color strip lights are also frequently seen these days. Undoubtedly, strip lights have a wide range of uses and are ideal for DIY lighting projects.
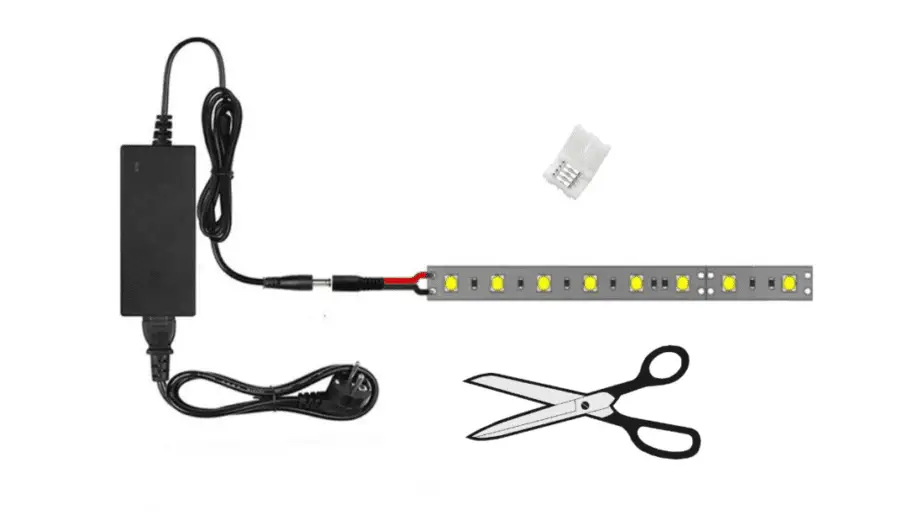
LED strip lights are becoming increasingly popular and many people desire to install strip lights themselves so that they may put their amazing strip lighting ideas into action. After knowing how to connect LED strip lights, users will be able to install strip lights like an expert. If you are still unsure after reading this information, please get professional help but I am hopeful, you won’t be needing it. So, without any further ado, let’s get started!
Can Led Strip Lights Be Joined Together?
Yes, definitely LED strip lights can be joined together and there are two major methods for linking LED strips. The simple solution is to use a strip connector, while a bit more difficult solution is to solder the connecting pads.
Things You’ll Need
- LED Strip Lights
- Power source
- Scissors
- Connectors
- LED Controller
A Quick Step-by-Step Guide to Connect Multiple Strip Lights
Step 1- Test Supplies to Be Installed
Before starting the journey of how to connect your LED strip lights, at first unplug or detach your strip lights from any sort of power supply.
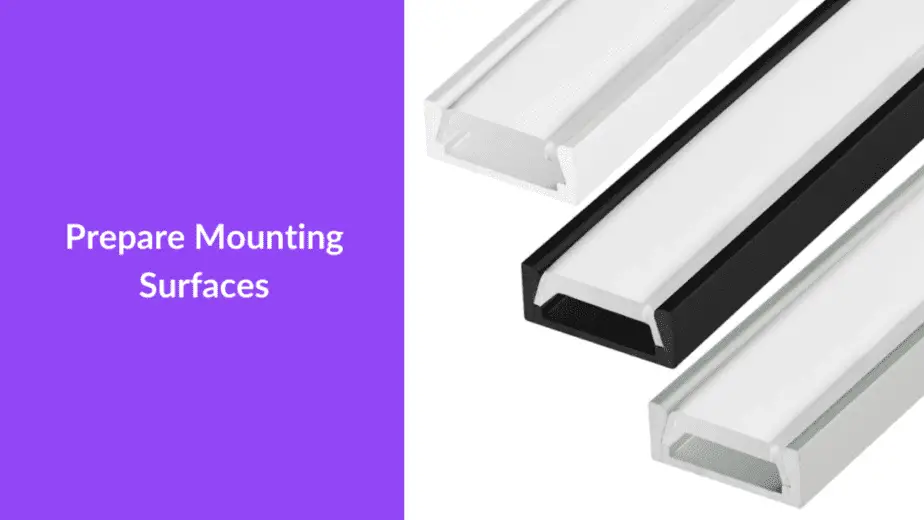
Step 2- Prepare Mounting Surfaces
In order for the self-adhesive on the back of the led strip lights to cling securely, it usually requires a flat surface. The interaction between the surface and the tape backing is limited by too rough or glossy surfaces. Because there is less contact, there is less of a bond, resulting in dropping or falling out in some areas.
Certain finishes do not bind well with the LED tape backing. If the surface is too oily, the strip will most likely slide around or not stick at all. Other mounting options for the strip lights will be required in these types of settings. Also, if you have too many dust particles around the area, even then your LED strips won’t stick in place therefore, clean your desired area with a piece of cloth.
Additional Information: The peel-and-stick backing is also affected by the environment around the strip. It may work at first, but the tape will fail as the surface temperature rises after one really hot day. This is because the strips are also affected by humidity and moisture in the air, which causes them to lose their adhesive ability.
Step 3- Measure Length
Make sure your measurements are correct. When you cut your strips, make sure you cut them in equal parts. Also do not forget to determine whether you require a straight or a 90-degree angled connector.
Step 4- How To Cut LED Strip Lights?
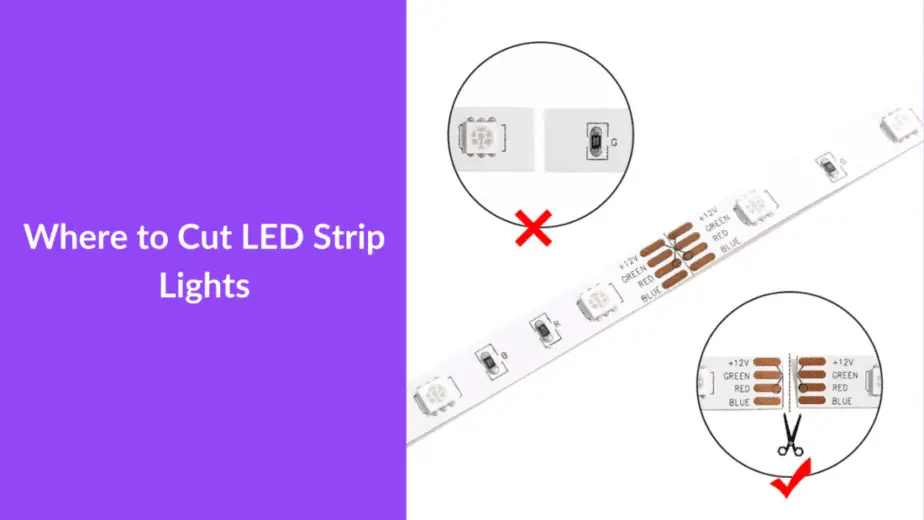
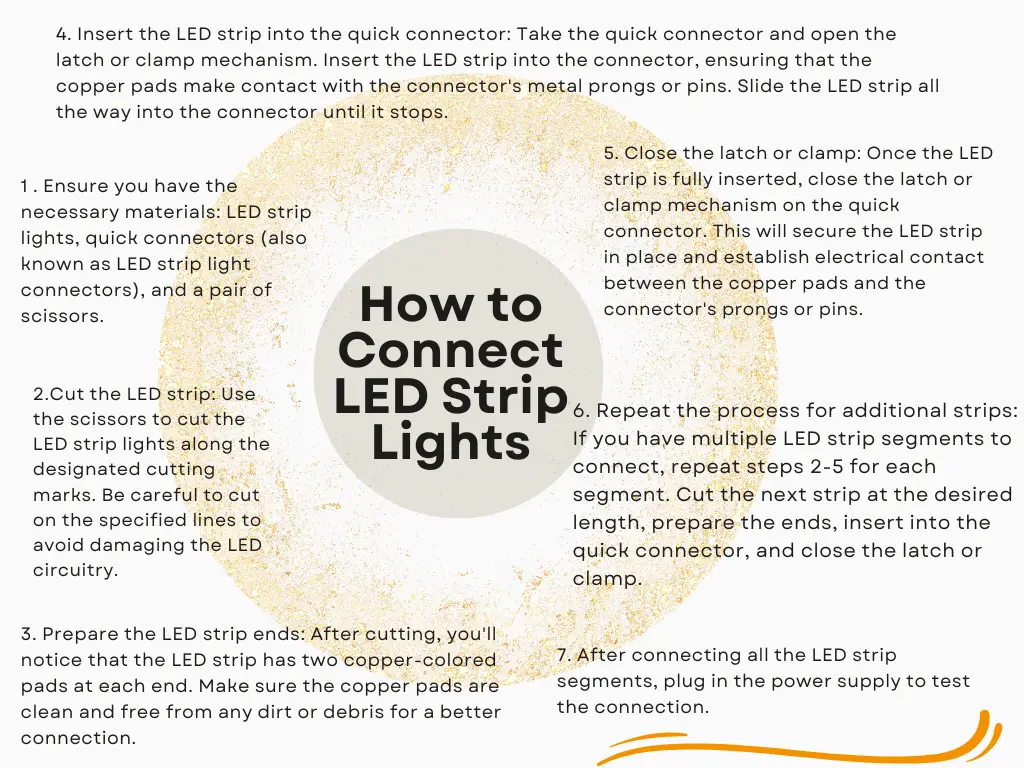
As you will be using scissors to cut these small copper bits, remember that you’ll need the same amount of copper on both portions if you want to reconnect them afterward. Making a clean cut on the designated copper line is critical so be careful while cutting your LED strip lights.
It is worth mentioning that each strip light portion should have an equal amount of copper leftover. This is required for your connector pins to function.
Where to Cut LED Strip Lights
Various quantities of tiny copper parts can be found throughout an LED strip. Copper section markers are visible every few inches on your LED strip light roll or section. Cut along the copper section’s pre-determined cut line with regular craft scissors.
As you will be using scissors to cut these small copper bits, remember that you’ll need the same amount of copper on both portions if you want to reconnect them afterward. Making a clean cut on the designated copper line is critical so be careful while cutting your LED strip lights.
It is worth mentioning that each strip light portion should have an equal amount of copper leftover. This is required for your connector pins to function.
Step 5- How To Connect LED Strip Lights Together?
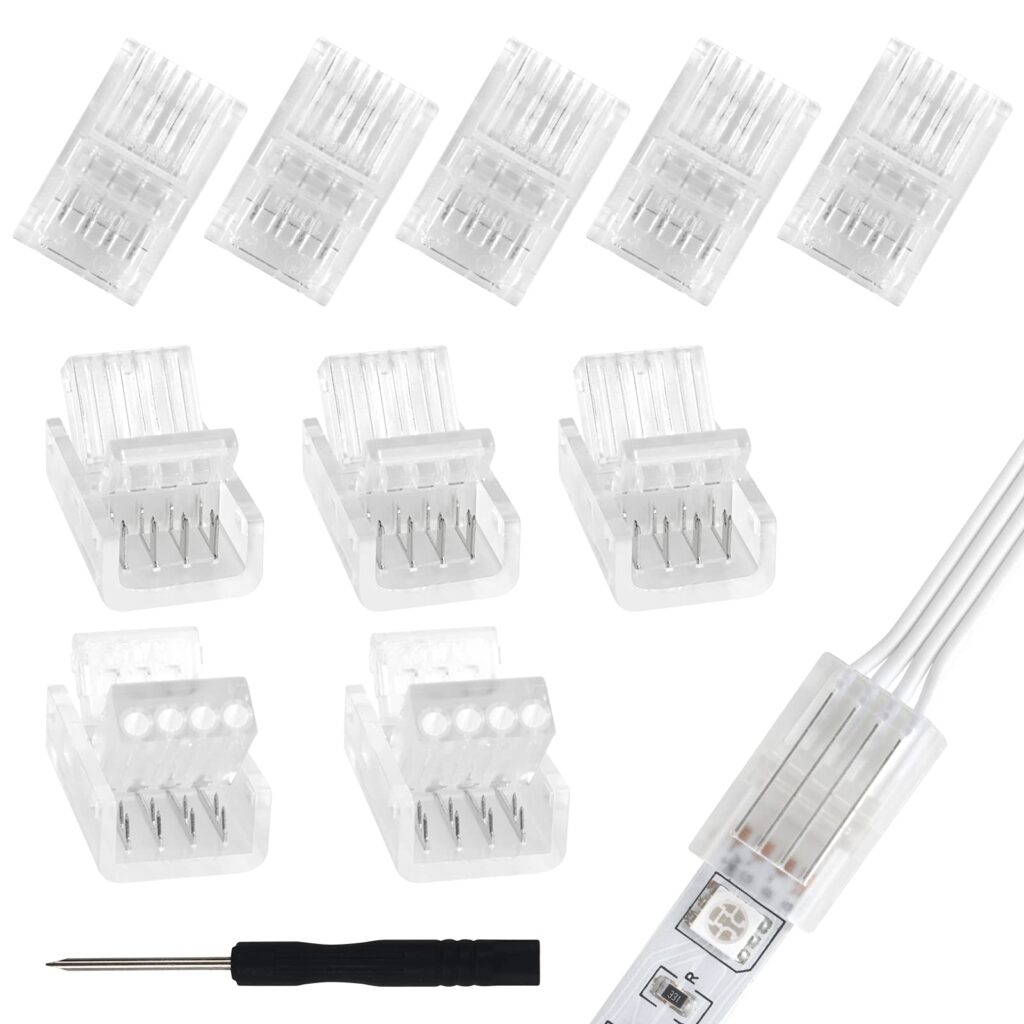
Since you are learning how to connect LED strip lights then you must know, there are two main methods for connecting LED strip lights. A gapless pin connector and a jumper connector are worth mentioning. Each allows you to connect two sections of low voltage strip lights without having to solder them together.
To accomplish a 90-degree turn, you may require an angle connector in addition to a gapless and jumper connector. If you want your strip lights to go in several directions, you can use a “T” shape connector too.
Gapless Pin Connectors
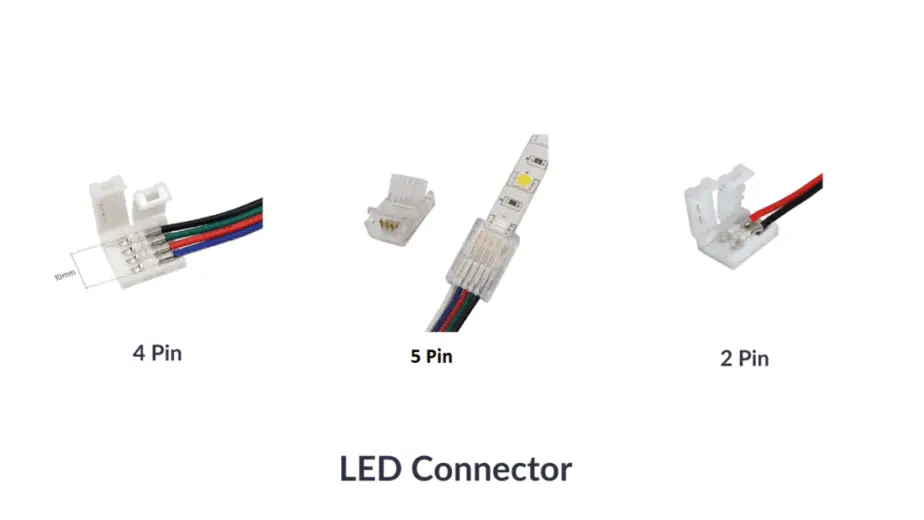
Using gapless pin connectors, you may create a continuous LED light run without a big gap. The number of pins used by each brand and style of LED strip light may vary. The most common connectors are 4 pins, however, 2 pin and 5 pin connectors are also seen to be in use.
Another thing to keep in mind is the width of the strip light. The majority of strip lights will be 3/8′′ or 10mm in diameter but check the manufacturer’s specifications for getting the exact dimensions.
WENHSIN– 4-Pin RGB LED Light Strip Connectors
LED strip light connectors to connect led strip lights without soldering.
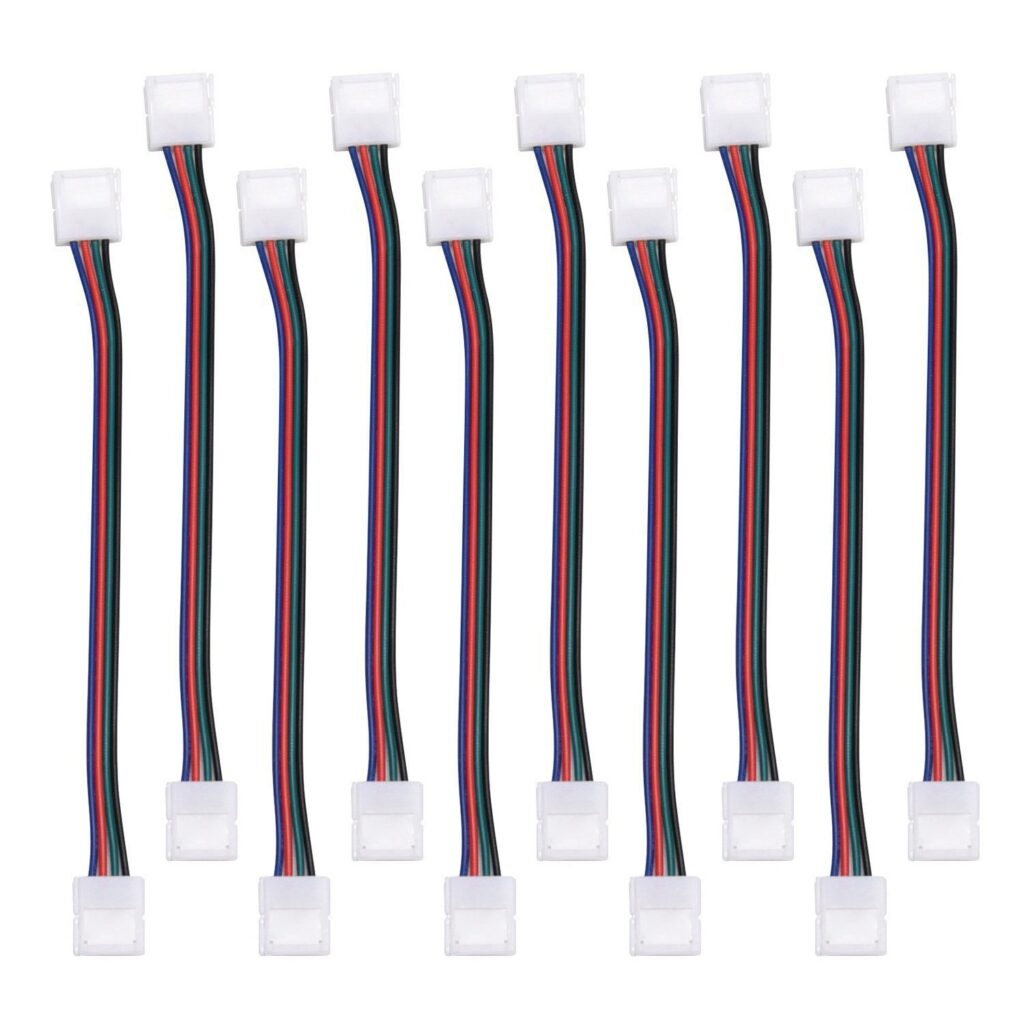
Jumper Cord Connectors
These bending jumper cords provide the same function as gapless pin connections, but with the addition of a small wired gap between strip light portions.
Those spaces are ideal for making slanted turns around corners or for filling in minor gaps beneath kitchen cabinets.
JACKYLED 10-Pack RGB LED Light Strip Connectors
4-Pin 10mm Wide Solderless Strip to Strip Jumper Extension Wire Angle Connector
2 Pin vs 4 Pin vs 5 Pin LED Strip Light Connectors
This usually denotes the type of strip light used. You might have an RGB, RGBW, or just a 12V warm white, for example.
These variations work with connections with 4 pins, 5 pins, and 2 pins. This will determine whether your strip light project succeeds or fails. You won’t succeed if you use the wrong amount of pins in your connectors.
Step 6- How To Connect LED Strips to A Power Supply?
Connect RGB LED Strip to RGB Controller
If you are using, for example, 12V 2 Amp adapter, then gently push it inside the RGB controller. The LED controller has two wires pointed out, one of them is for your RGB LED strips lights. Just by looking at both the wires, you will know which one is for connecting your RGB LED strips so you attach them together.
After all the connections are made, insert the plug into your power supply. Once you turn on your remote controller after that, you will see your LED lights are ready to shine!
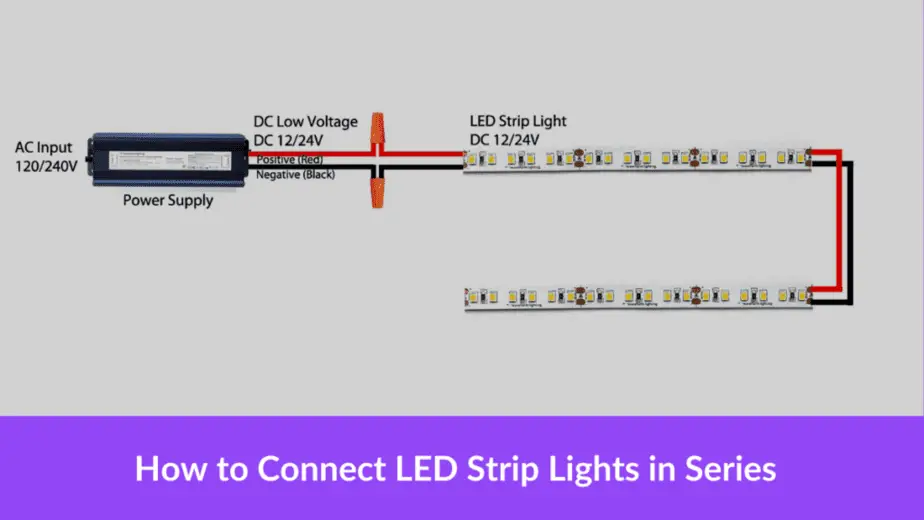
How to Connect LED Strip Lights in Series?
It’s as simple as connecting one end of an LED strip to the next part of an LED strip. If you only need to cover a short distance, solderless connectors may come in help, or if you want to cross a long distance with copper wires then cut to the exact length you require.
Be cautious while connecting LED strips in series because there is a chance for voltage drop if you opt for longer runs, but other than that, all you need to do is make an electrical connection between the positive/negative copper pads from one LED strip portion to the next.
Step 7- How To Power LED Strips?
Now, once you are done with attaching all the connections together. It’s time to place the strip lights in place and for that, at first peel off any adhesive backing from your little plastic gapless or jumper connector to enable a clean connection.
Then gently insert each strip light portion into the connecting piece. You need to carefully snap the strip lights into position using the little clamps on the connector. Finally, get the plug and insert it into your power source and see.
Step 8- Testing Connections
Make sure both sides of the strip light are pointing in the right direction. For voltage to pass through, the polarity must be proper. Check for light on both sides of the connector after plugging in your strip lights. Check the polarity and flip the strip light if necessary when you will see there is no light on the new portion of the strip light.
If everything is finely done, and you plug in your LED strip lights and turn on your remote controller, then Congratulations!!! You have successfully learned how to connect LED strip lights all by yourself.
How to Hang LED Strip Lights?
Simply unroll along the length of your LED strip lights you’ll be using, then peel off the adhesive backing, and adhere to the designated surface. Gently attaching your LED strips against your desired area, each component of the strip should be securely glued to the surface and free of air bubbles.
LED Strip Lights You Can’t Cut (RGBIC)
It is not possible to cut all LED strip lights and RGBIC strip lights, are mentionable among those. The RGBIC technology enables the strip lights to show many colors all at once. They achieve this by employing Independent Control. As the RGBIC strip lights give off many colors at the same time, the color-changing chips are used throughout the roll and can be damaged easily after it is cut.
Tips
- Put on protective goggles if you are going for soldering and make sure the location is well ventilated. Otherwise, you will not need it.
- Wipe the installation point dry after washing it with warm water.
- Remove the adhesive backing gently from the LEDs and press them into place.
- Using the dotted markings on the strips, cut the LEDs to size with attention.
Warnings
- Check that the voltage and current ratings on your power supply are compatible with the LED strip.
- Examine any connections that appear to be loose.
- Look for short circuits that aren’t visible.
- As you will be working with electricity too, therefore, always check to see if your power supply is operational.
Read also: Can You Sleep with Led Strip Lights On
FAQs: How to Connect LED Strip Lights
u003cstrongu003eHow to Connect Multiple LED Strips to One Power Source?u003c/strongu003e
If you have 32 feet long strips then you’ll need to divide them into at least two halves. You’ll need two strips of 30 feet each to complete two equal portions. The first strip should be run directly from the power source. And in order to power the second strip, you need to run a parallel pair of wires to the point where the first LED strip finishes.
u003cstrongu003eCan I Connect 2 Different Brands of LED Light Strips Together?u003c/strongu003e
Just in case you’re attempting to connect two strips of different voltages. In such a case, due to the varied voltage needs for each strip, they will simply not work. u003cbru003eYou must also ensure that the polarity is appropriately aligned while connecting them. The polarity of different brands of light strips may be wired somewhat differently; make sure the positive connectors are aligned.u003cbru003eTo be specific, there should be a plus and minus symbol next to the copper pads.u003cbru003eThere are different LED strip light brands that might be of varying quality. If you connect LED strips from different brands, you can notice that one of them wears out sooner than the others.
u003cstrongu003eHow Do You Hook up A Strip Light?u003c/strongu003e
You can hook up a strip light either by using a strip connector, or you can go for soldering the connecting pads.
u003cstrongu003eHow Many LED Strips Can You Connect?u003c/strongu003e
Remember that the resistance of wire rises with distance when deciding how many strips to join together. With LED strips, it’s no different. As a general rule, it is advised to connect no more than three complete strips end-to-end without first adding extra, higher-gauge power cable or additional power supply units.
u003cstrongu003eCan I Connect 12 v RGB Headers to 5 v RGB Connections?u003c/strongu003e
Without a doubt, the two RGB versions are incompatible and do not operate together. If you plug a 5v circuit into a 12v header, the device you’re plugging in could be damaged.
Read also: Can You Cut LED Light Strips?
Conclusion: How to Connect LED Strip Lights
LED strip lights have a lot of benefits. They run on 12V or 24V DC, which is a relatively low voltage. They are adaptable to various lighting design shapes and can be applied to curved surfaces. It is uncommon for strip lights to provide lighting without noticing the lighting fixture because of its thin and flat low profile design.
Without a doubt, LED lights are a fantastic method to enhance the aesthetic of your home.
Related Article…
The Best Color Light for Sleep… What are the Benefits of Night Lights?
Night lights can improve your sleeping experience as certain lights help you fall asleep faster. LED lights allow you to choose the best color light for sleep…
3000K vs 4000K – What’s The Actual Difference?
Just in case you are wondering which light will be suitable for your home setting then you must have a look at the 3000K vs 4000K article…
How to Make Black with LED Lights
A blacklight is a useful utility in many circumstances. Even if you do not have a device, you can make black with Led lights if you follow some directions…
How to Make a Carb in A Lightbulb
This article serves to benefit anyone who wants to learn more about how to make a carb in a lightbulb…
How to Make LED Christmas Lights Look Warmer
Not satisfied with your cool-toned Christmas decorations? This article will help you figure out how to make LED Christmas lights look warmer…

My strong expertise is illuminating spaces. With a keen eye for detail and a passion for transforming environments through lighting, my dream is to leave indelible mark on the world of light design. Below are few facts of my biography, highlighting career and hobbies. Click here to contact me.

