In any event, LED lights are a fantastic way to brighten up your room. Lights add a distinct type of joy to our lives, and when your LED lights stop operating, they can ruin your mood. As a result, we’ve prepared detailed instructions on how to fix broken LED light strips.
When there is a broken connection or faulty wiring between two pieces of the strips, they will collapse. These bad connections can obstruct power flow and cause other working strips connected to the faulty strip to turn off.
Replacing the problematic piece with a new functional strip is the best wacy to solve this problem. This article will show you how to fix your faulty light strips step by step.
You’ll learn how to recognize which strip has to be replaced and how to separate it from the functional strip. You’ll also learn how to properly secure and rejoin the two functional strips by replacing and reconnecting them.
How To Fix Broken LED Light Strips: Things You’ll Need
- Extra LED strips
- LED Shim
- Soldering Iron + Solder
- Clippers
- Heat Gun or Lighter
- Xacto Knife or Scissors
Not necessarily you will need all these items because your issue can be one and you might just a few things from this list above.
A Stepwise Guide On How To Fix Broken LED Light Strips
Step 0: Troubleshoot and Fix Common LED Problems
Sometimes, your LED strip lights can have other problems besides a broken connection or a faulty wiring. For example, you might notice that some of the lights are not working, or that the colors are inconsistent along the strip. In this section, we will show you how to troubleshoot and fix some of the most common LED problems.
- Lights are not working: If none of the lights on your LED strip are working, the first thing you should check is the power supply. Make sure that it is plugged in and switched on, and that the output voltage matches the voltage of your LED strip (usually 12V or 24V). You can also use a multimeter to measure the voltage at the end of the strip, and see if it is within the acceptable range. If the power supply is working properly, but the lights are still not working, you might have a problem with the controller or the receiver. Try connecting the power supply directly to the strip, bypassing the controller and the receiver, and see if the lights turn on. If they do, then you need to replace the controller or the receiver. If they don’t, then you might have a damaged LED strip, and you need to replace it with a new one.
- Lights are showing inconsistent colors: If some of the lights on your LED strip are showing different colors than the rest, you might have a problem with the addressable LED or the resistor. An addressable LED is a type of LED that can be individually controlled and programmed to display different colors and patterns. A resistor is a component that regulates the current and voltage in the circuit. If either the LED or the resistor is damaged, it can affect the color and brightness of the light. To fix this problem, you need to identify the faulty section of the strip, and replace it with a new one. You can use a soldering iron or a connector clip to join the new section to the working strip. Make sure that the polarity and the color order are correct, and that the connections are secure.
- Blue lights stop working: If the blue lights on your LED strip stop working, you might have a problem with the voltage drop. Voltage drop is a phenomenon that occurs when the voltage decreases along the length of the wire, due to the resistance of the wire and the load of the LEDs. This can cause the blue LEDs, which require a higher voltage than the red and green LEDs, to dim or turn off. To fix this problem, you need to reduce the length of the wire, or use a thicker wire with lower resistance. You can also use a voltage booster or a power repeater to increase the voltage at the end of the strip. Alternatively, you can split the strip into shorter sections, and connect them in parallel to the power supply, instead of in series. This way, each section will receive the same voltage, and the blue lights will work normally.
Step 1: Identify The Cause
The first step in repairing your broken LED light strip is to determine what is causing your lights to stop operating. As a result, take a close look at the strip to see whether there are any obvious flaws.
Step 2: Check The Strip And Repair
Find the area where the lights cease working and there are four connections labeled on the strip so cut off the part where the “cut here” sign is marked using a scissor. The problematic strip will be separated from the working strip by cutting along the “cut here” line.
Make sure the new strip is parallel to the working strip and that they are both stable. Take a look at the four connections in reverse order. For instance, R to R, G to G, and so on. Apply solder to all four connections in any sequence. Verify that the solder is secure and stable. Plug in the strip and switch the lights to all the colors once the four connections are soldered tightly. You can now arrange the lights wherever you want.
Note: If the strips had an adhesive backing, you might need to get some new adhesive. Use an acetone-soaked cloth or a citrus-based cleaner to remove the adhesive residue off the back of the strips without damaging them. Ensure that the liquid does not come into contact with the LEDs, since this will result in water damage and a reduction in the strips’ efficiency.
Allow a layer of double-sided tape to dry on the backs of your LEDs before putting a layer of double-sided tape, wiping the surface with rubbing alcohol, and relocating the LED.
Step 3: Check The Power Supply
Multiply the length of your LED strip in feet by the watts generated per foot and multiply by 1.2. This will determine the minimum power supply size required to run your strips. Because power supplies come in a variety of wattages, you’ll take the figure you came up with and look for the nearest power supply with a higher wattage rating. For example, if your calculation shows 70 watts then you might need a power supply of 90 watts at least.
Step 4: Change The power supply
Therefore, if your LED lights have stopped working due to overheating then you might consider replacing your power supply with higher watts.
Step 5: Check The Voltage
Another noticeable thing to look at is the power supply you select is compatible with the voltage of your LED strip lighting. So, double-check that the power supply’s input voltage matches the voltage at the place where it will be used. If you want to utilize a 12-volt DC LED strip then you’ll use a power supply that accepts 120 volts as an input and output and has a 12-volt DC output.
Voltage drop is another element to consider during longer runs. After a given distance of the LED strip, there is a substantial voltage drop. There will be insufficient voltage to light the following length of the strip after such distance. This depends on the sort of strip and also its length you are using.
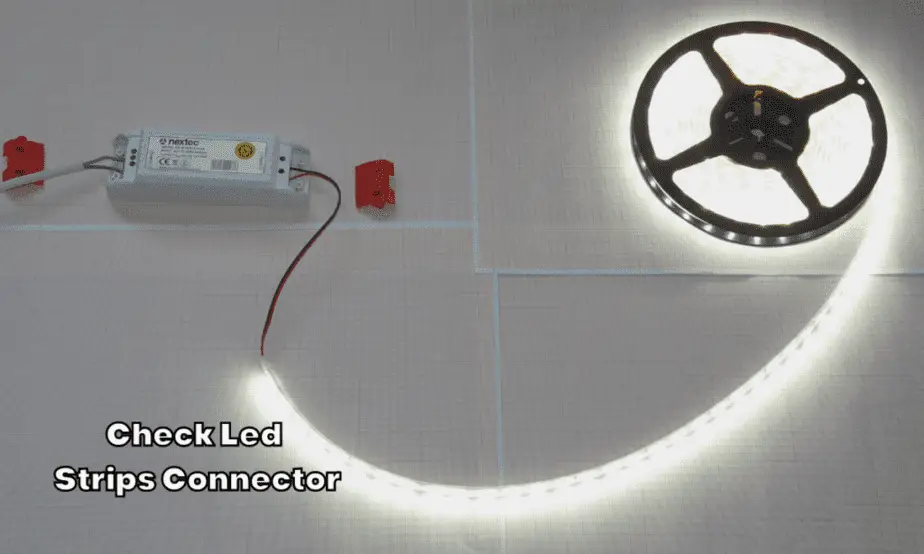
Step 6: Check The Connector
One of the main reasons for broken led light strips can be loose or wrong connectors. Therefore, first, check the connector carefully and make sure you are using the required pin connector for your LED lights because a simple white LED light strip has two pins, you’ll need a two-pin connector. If your RGB strip lights have four pins, ensure the strip connections you buy have the same four pins. Simply place your tape under the contact pads and press down until you hear it click, then repeat the process all the way around.
The LED light should work without a hitch if the contact pads are carefully inserted with the tape. Insert the strip into the connector with attention. Make sure the strip is positioned beneath the ridges on both sides. Make no attempt to force the strip into the connector using any tools.
Step 7: Fix The LED Strips
In order to fix broken led light strips, you need to Insert the strip into the connector with attention. Make sure the strip is positioned beneath the ridges on both sides. Make no attempt to force the strip into the connector using any tools.
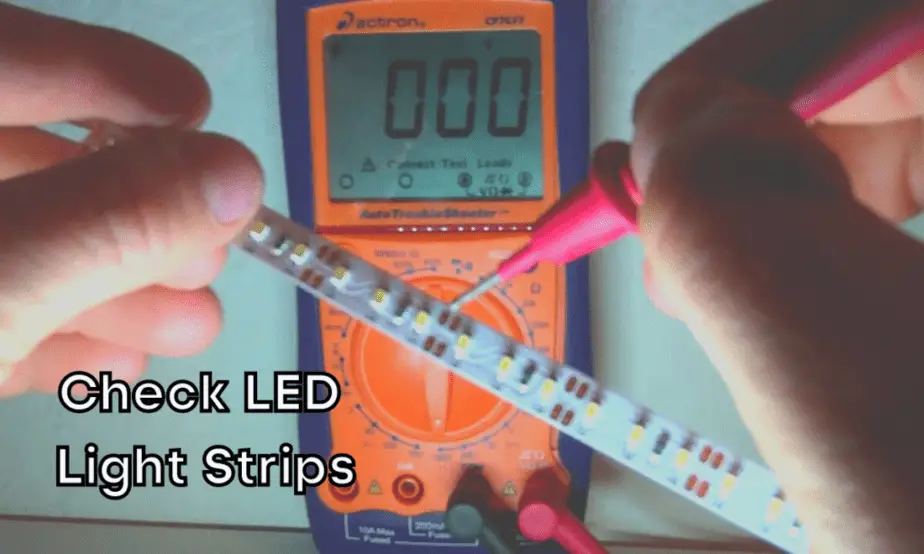
Step 8: Test It
A multimeter with a diode setting is required to test LED lights. Connect the multimeter’s negative lead to the LED’s cathode (negative) lead. The red and black test leads should be plugged into the multimeter’s front outlets. The positive charge is represented by the red lead.
The black lead is negative and should be connected to the “COM” input. The LED should shine softly when it’s turned on, showing that it’s functional. Replace the connection to the LED leads if the LED does not illuminate. If the LED still does not light, it is defective.
How To Fix Broken LED Light Strips: Tip
For your convenience, all of the LED strips come with pre-marked cut lines. If you’re using waterproof LED light strips, make sure to cover the cut end with an end cap to keep it away from water.
How To Fix Broken LED Light Strips: Warnings
Low-voltage DC electronics are typically thought to be harmless and represent a low risk of shock. However, we highly suggest that you turn off or unplug the power source before testing or adjusting any LED strips or accessories, if possible.
How To Fix Broken LED Light Strips: Precautions
The strips are safe as long as the cut ends are covered and sealed, stray wires are kept out of reach, and any little unwanted parts are appropriately disposed of.

Read also: Can You Cut LED Light Strips?
FAQs: How To Fix Broken LED Light Strips
Can LED Strip Light Be Repaired?
Yes, new LED bulbs make it possible to repair practically everything. All you have to do now is identify the issue and take appropriate steps to repair or replace any damaged parts of the LED bulb so that your light can operate effectively once more.
How Do You Fix LED Strips That Won’t Turn On?
Look for any noticeable faulty wiring, and double-check that all of your connectors and cables are in place and haven’t come loose. Tighten DC adapter screws and re-insert LED strips into solderless connections, as these are common contact failure spots.
How Do I Fix My LED Light Connector?
Simply put your tape beneath the contact pads and press down to hear it click, then repeat the process all the way along. If you carefully insert the contact pads with the tape then the LED light should work without any doubt.
Why Are My LED Strip Lights Not Working?
Check your pin connections if your LED strip light does not turn on anyway. Most likely, the pin isn’t correctly put. The pin may be defective in some circumstances. Because these tiny connectors are sensitive, you must install them with extreme caution. If you use too much effort, the pins can easily become crooked or even break.
How Do You Re Stick LED Lights?
If the old adhesives have already lost their stickiness, remove them. To remove the adhesive residue from the back of the strips without damaging them, use an acetone-soaked cloth or a citrus-based cleanser. Make sure the liquid does not come into touch with the LEDs since this will cause water damage and disrupt the strips’ effectiveness.
Allow the backs of your LEDs to dry before applying a layer of double-sided tape, cleaning the surface with rubbing alcohol, and repositioning your LED.
How Do You Reconnect LED Strips After Cutting?
If you want to rejoin it after cutting them, you’ll need an extra four-pin connector. However, if the cut and connect process is done incorrectly, the light strip may stop functioning. As a result, we advise double-checking the length of the strip before cutting to avoid having to reconnect afterward.
Conclusion: How To Fix Broken LED Light Strips
By now, you should have a firm grasp on how to fix broken LED light strips. These LED lights are undoubtedly amazing and beautiful to have in your room, but they might be a bit tricky to repair if they shatter. As a result, you must be aware of all the minor aspects to search for if your LED lights cease working. Hopefully, you’ll be able to reach all of the places and install your LED strips in a blink of an eye.
You may also read: How To Make A Light Bulb Less Bright

My strong expertise is illuminating spaces. With a keen eye for detail and a passion for transforming environments through lighting, my dream is to leave indelible mark on the world of light design. Below are few facts of my biography, highlighting career and hobbies. Click here to contact me.
